Okay guys, I have sacrificed my hair on the alter of the Bleach Gods in the name of research and they have blessed me in return. Or something. Basically, what I'm saying here is that I took the risk of bleaching and colouring my hair at home, it worked, and now I'm telling you guys about it because I'm a top gal.
I have always loved brightly coloured hair, but as a natural brunette my only real way of achieving that is bleach. My problems with bleaching my hair, however, have always been that 1. It's expensive professionally 2. DIY bleach can often go wrong 3. It could seriously damage my hair and, now my hair is natural, ruin my curl pattern, and finally 4. Even if I succeeded, maintaining would be a pain.
BUT...I can only be afraid of something for so long before I think "Meh, I'll do it anyway and see what happens." It's kind of dangerous, really. I bet you'll see me in the news one day after I poke a sleeping grizzly or something. ANYWAYYYY, I bit the bullet and decided to risk it for a chocolate biscuit. Aaaand here's the result!


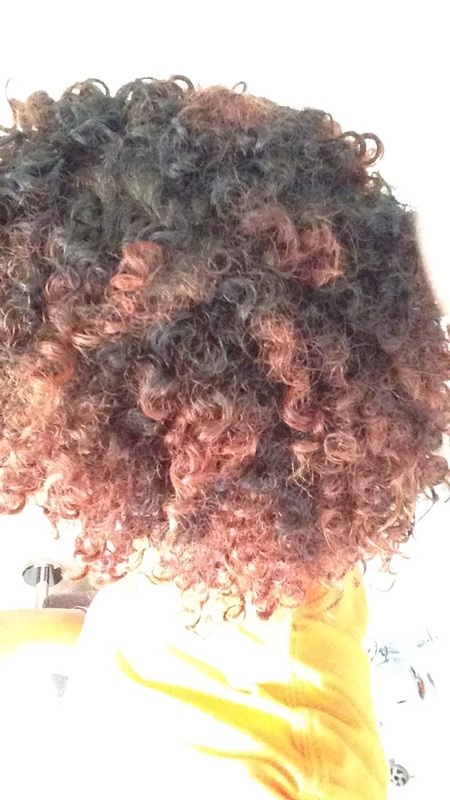
So as you can see, I bleached and coloured my hair--AT HOME, by the way!--and my curls are still...uh..curling!
The ombre trend that's been 'in' for the past couple of years is what gave birth to the more alternative 'dip dye' trend which usually features brighter, less natural colours. Even though my fro grows out and not down, I decided dip dye was the way I wanted to go too. Why? Well first of all, if it DOES go terribly wrong, all you have to do is take a deep breath and say bye bye to those ends! Which is particularly easy when your hair's already pretty short, like mine. Second, dip-dyeing means you don't have to worry about your roots!
So, here's what I used:
- III Sisters of Nature sulphate free shampoo
- ORS Hair Mayonnaise
- Dr Miracle's Double Deep Moisturising Masque
- Palmer's Olive Oil Formula Conditioner
- coconut oil
- plastic shower caps
- L'Oreal Wild Ombre's No1
- Adore semi-permanent dye in 114, Violet Gem
- A tinting kit from good old Primark
- my phone, as a timer!


So I read, while researching, that box dye kits are considered...not great. With this in mind, I did search for some good old fashioned bleach, BUT when I came across the L'Oreal Wilde Ombre kits, I realised they were a much better option for me. You see, in order to minimise damage, I didn't want to lift my hair colour too much--I just wanted it to be light enough for my semi-permanent colour to show up brightly. The Wild Ombre kits are designed to create a subtle lightening depending on the colour of your natural hair. I chose 01 as it was the darkest option. The tinting kits (I bought two!) were £1!! ONE. POUND. STERLING. MY FRIENDS. ALL HAIL PRIMARK. Because I was using semi-permanent dye from a bottle, I bought the kits to make application easier.
Now, the shower caps are my new secret weapon. You know how many hair products, including deep conditioning treatments and some hair dyes, call for processing with heat? Well I don't know about you guys, but I don't have a hooded drier knocking around at home! So instead, I pop on a shower cap, set my hair drier on 'low' and voila! Home processing! I know, I know, I'm an absolute genius.
Anyway: before you bleach your hair, it's important to prepare the hair properly. Bleach strips your hair of its colour, but this process is extremely damaging. For this reason, I started preparing days before I coloured my hair. Around ten days before Bleach Day (B DAY, DUN DUN DUNNN) I washed my hair with sulphate-free shampoo and deep-conditioned with my ORS Hair Mayonnaise, which contains protein--vital when planning to bleach hair, or maintaining hair that's already bleached. I kept my hair moisturised and in a protective style for a week; then, three days before B Day, I used my sulphate-free shampoo and ORS treatment again, and followed it up with my Dr Miracles' Masque because MOISTURE. Then I applied coconut oil to my hair. I kept the oil in until I bleached my hair, and WHILE I bleached my hair, to protect it as much as possible and maintain moisture. This is known as the coconut bleaching method.
Now you may be wondering how I managed to essentially pre-poo for three days and still go about my daily life without looking like a wild woman. Well my friends, allow me to introduce you to my COMPLETELY ADORABLE TWISTED UPDO.


So, now that you know all about my preparation, here's how I actually did my hair!
STEP ONE: BLEACHING
The step-by-step instructions in the L'Oreal kit tell you how to mix the bleaching powder and lightening cream, and how to use the really great applicator brush. After testing a patch of my hair to make sure nothing terrible was going to happen, I undid all my twists. This gave me a kind of chunky twist-out look, pre-separation and fluffing, which is what I was going for; my hair essentially remained in small sections clumped together, which was a lot easier to see and deal with than my natural curls--plus, my hair was relatively tangle-free, which was helpful when using the comb-like applicator. I pulled each clumped curl taught and applied the bleach, starting at the end of the strand to concentrate the lightening effect there, and gradually dispersing it upwards until I reached the point where I was happy to stop.
Now, the kit recommends that the bleach be left for between 25-45 minutes. I started a timer on my phone when I first started applying the bleach, so that I could keep an eye on how long I'd been going at it. By leaving my hair uncovered as it processed, I was able to carefully monitor the progress of the bleach and also keep an eye on the erm... structural integrity of my curl pattern! I ended up leaving the bleach on for around thirty minutes, at which point my hair looked like this:
My hair has always been slightly reddish, and tends to go gingery rather than light in the summer. So perhaps it's not surprising that lightening my hair turned it kind of... pink? Orange? Whatever! I decided at that point that it was light enough to be coloured, so I rinsed it out. THEN, before moving on, I used my ORS Hair Mayonnaise and left it in for 30 minutes. THEN I used my Dr Miracle Moisturising Masque too, because I'm extra with these things! Finally, it was time to break out the colour: a deep violet which, I'm gonna be honest, I bought after seeing one of my celebrity faves, Dascha Polanco, for Latina magazine. I squirted about half of the bottle of dye into my Primark tinting bowl, started out trying to use the little paint brush thingies, and ended up scooping up dye with my plastic-gloved hands (thanks, Wild Ombre kit!) and slapping it on the ends of my hair while leaning over the bath tub. Yeah, things were highly scientific at this point. I then slapped on another trusty shower cap and processed my hair for fifteen minutes, as the bottle instructed!


After that, I rinsed my hair thoroughly until the water stopped running pink-ish and started running water-ish. Then, because I know how semi-permanent dyes love to play, I conditioned, detangled, and rinsed again--and the water was pink again! But, finally, it ran clear, and I've had no problems so far with the dye rubbing off onto anything, which semi-permanents do sometimes.
I styled my hair as usual--a wash and go-- and so far I haven't noticed it being unusually frizzy or breaking or anything terrible like that, so I'm calling this a success. However, I am tweaking my regimen to accommodate for the damage that bleach does to the hair, as well as to keep my colour for as long as possible. So I'll be using a sulphate-free shampoo weekly (though I will use 'bad' shampoo once a month--got to keep that scalp fresh to death y'know) and will also use my two conditioning treatments weekly, too.
As a final comparison for you guys, here is the colour that inspired me, compared to the dye I bought and how it turned out. I'm pretty pleased with it!


 RSS Feed
